192.168.1.1 Admin Login
192.168.1.1 is one of the most common private IP addresses used to access a router’s admin panel. If you have ever tried to set up or manage your home or office WiFi network, you have likely seen this IP because it is the default gateway for many popular router brands such as TP-Link, PLDT, Huawei, Netgear, Linksys, and D-Link. By logging in via 192.168.1.1, users can manage all key network settings.
This includes changing the WiFi name and password, improving security, managing connected devices, updating firmware, and troubleshooting connection issues. Understanding how 192.168.1.1 works gives you complete control over your router and helps you keep your internet fast, secure, and stable.
How to Log In to the 192.168.1.1 Admin Panel (Step by Step)
Accessing the 192.168.1.1 admin page is as simple as long as your device is connected to the correct network. Follow these steps to open the router dashboard and begin configuring your settings.
Step 1: Connect to the Router Network
Connect your computer, laptop, or mobile device to the router’s WiFi network. You can also use an Ethernet cable for a more stable connection. If you are not connected to the router, the login page will not load.
Step 2: Open Any Web Browser
Launch your preferred browser, such as Chrome, Firefox, Edge, or Safari. Make sure the address bar is clear before typing the IP address.
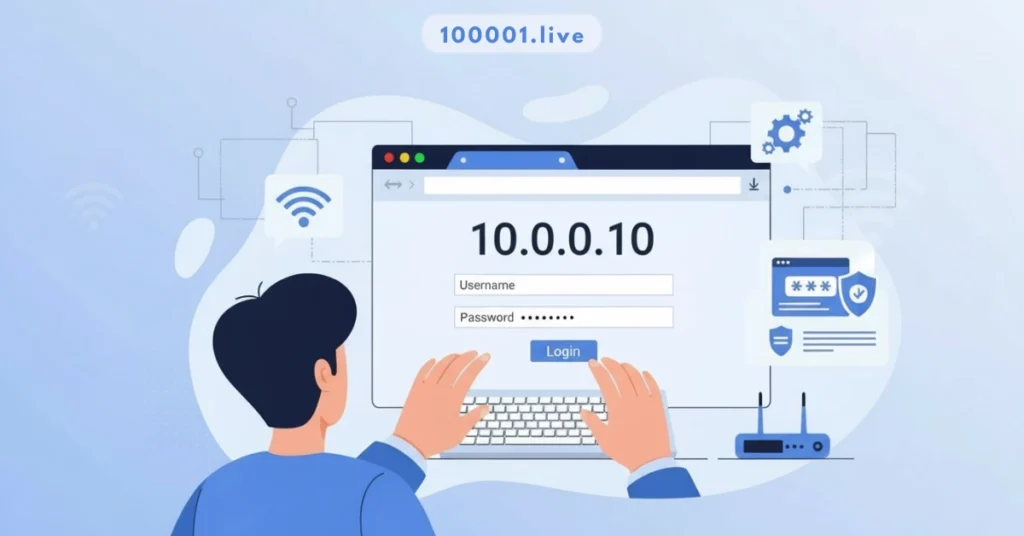
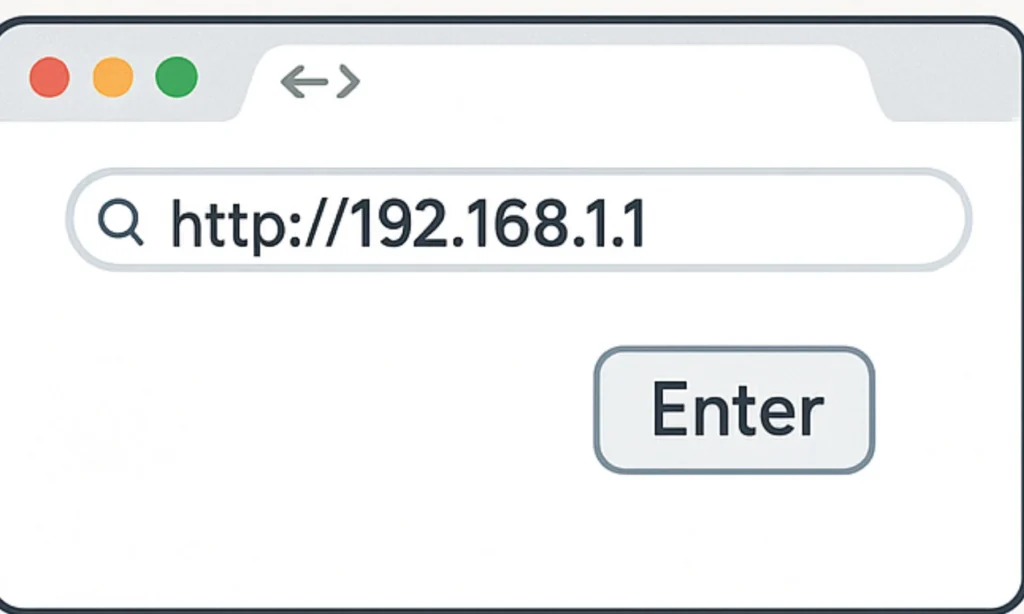
Step 3: Enter the Address http://192.168.1.1
Type the IP address into the browser’s address bar and press Enter. If the router uses this IP, the login page will appear. If you see an error, the router may be using a different gateway, such as 192.168.0.1 or 10.0.0.1.
Step 4: Enter the Username and Password
You will be asked to enter your login details. Common default combinations include:
- admin/admin
- admin/password
- admin / 1234
If these do not work, check the sticker on the back or bottom of your router. You can also find the correct login information in the router manual or from your internet provider.
Step 5: Access the Admin Dashboard
Once you log in successfully, you will reach the router’s main control panel. From here, you can change the WiFi name and password, update security settings, manage connected devices, configure parental controls, set up guest networks, update firmware, and customize many other options.
Relevant IP Adresses:
To check your remaining internet credits, visit the 10.0.0.0.1 piso wifi time page.
Check our router IP address database for alternative login URLs.
D-Link and TP-Link users often find their settings at 192.168.0.1.
For high-end fiber modems, the default is frequently 192.168.100.1.
How 192.168.1.1 Works
192.168.1.1 is a private IP address that routes traffic within your local network. To understand why this IP is used and how it works, it helps to know a few basic networking concepts.
Private IP vs Public IP
A private IP is used only within a local network, while a public IP is used to communicate with the internet. Devices in your home, including your router, computers, and phones, use private IP addresses. Your internet service provider assigns your router a public IP so it can communicate outside your network.
DHCP, Network ID, and Device ID
Routers typically use DHCP to automatically assign private IP addresses to devices. An IP address is divided into two parts. The network ID identifies the local network, while the device ID identifies each device connected to it. In 192.168.1.1, the network portion is 192.168.1, and the final 1 is the device ID for the router.
NAT (Network Address Translation)
NAT is a router feature that lets multiple devices share a single public IP address. It helps keep the network secure and allows many devices to connect to the internet simultaneously without conflict.
Why 192.168.1.1 Is the Default Gateway
Router manufacturers often choose 192.168.1.1 as the gateway because it is simple, widely compatible, and easy to remember. It serves as the primary access point, where users can log in to the admin panel, manage settings, and control the entire network.
Default Usernames and Passwords for 192.168.1.1
Most routers that use 192.168.1.1 come with preset login credentials that allow users to access the admin panel for the first time. These details are often printed on a sticker attached to the router and can vary by brand and model. The following table lists the most common default usernames and passwords for popular router brands that use 192.168.1.1 as their gateway address.
Default Login Credentials
Router Brand | Default IP Address | Username | Password |
192.168.1.1 | admin | admin | |
D-Link | 192.168.1.1 | admin | admin |
Netgear | 192.168.1.1 | admin | password |
Linksys | 192.168.1.1 | admin | admin |
Huawei | 192.168.1.1 | admin | admin |
Zyxel | 192.168.1.1 | admin | 1234 |
ASUS | 192.168.1.1 | admin | admin |
192.168.1.1 | admin | admin | |
Belkin | 192.168.1.1 | admin | (blank) |
PLDT | 192.168.1.1 | admin | 1234 or pldtadmin |
Others | 192.168.1.1 | admin | varies by model |
These default credentials are intended for initial setup only. For security reasons, users should change their username and password immediately after logging in. If the listed defaults do not work, the correct login information can usually be found on the router’s label or in the user manual.
Forgot Your 192.168.1.1 Username and Password? Here is How to Recover It
Losing access to your router login is very common, and recovering it is usually simple. Follow the steps below to regain access to the 192.168.1.1 admin page.
1. Check the Router Sticker
Most routers have a sticker on the back or bottom that contains the default username and password. Look for information such as admin, password, or 1234. Try these details on the login page.
2. Search Online for Your Router Model
If the sticker is damaged, missing, or unclear, search the default login details for your exact router model. For example, search for TP-Link default login or Huawei router default password. Manufacturers often publish this information.
3. Try Common Default Credentials
Many routers use universal login combinations. You can try the following standard defaults:
- admin/admin
- admin/password
- admin / 1234
5. Create a New Login and Save It
After you regain access, create a strong new username and password to secure your router. Save these details somewhere safe so you do not lose access again.
5. Perform a Factory Reset
If you changed the login password and no longer remember it, a factory reset is the only way to restore access.
- Reset button location
The reset button is usually a small, recessed button found on the back of the router. - How long to press the button
Use a pin or paper clip and press the button for about 10 to 15 seconds until the router’s lights blink or restart. - What happens after the reset
The router returns to its original factory settings. This means all custom configurations are erased, including WiFi names, passwords, and login details. - How to log in after the reset
Once the router has restarted, open your browser and go to http://192.168.1.1. Enter the default username and password from the router label or the manual.
How to Find Your Router's IP Address (If 192.168.1.1 Does Not Work)
If the page at 192.168.1.1 does not load, your router may be using a different default gateway. Many brands use other private IPs such as 192.168.0.1, 192.168.10.1, 192.168.15.1, or even 10.0.0.1. You can easily find the correct IP address by checking your device settings.
On Windows
- Press the Windows key and type Control Panel.
- Open the Network and Internet.
- Select Network and Sharing Center.
- Click your WiFi or Ethernet connection.
- Choose Details.
- Look for the Default Gateway. This value is your router’s IP address.
On macOS
- Click the Apple menu and open System Settings.
- Choose Network.
- Select your WiFi or Ethernet connection.
- Click Details.
- Check the Router field to find your gateway address.
On Android
- Open Settings.
- Go to WiFi.
- Tap the connected network.
- Scroll to the IP settings or Advanced section.
- The Gateway field shows your router’s IP address.
On iPhone or iPad
- Open Settings.
- Tap WiFi.
- Select the information icon next to the connected network.
- Look for the Router field. This is your gateway IP.
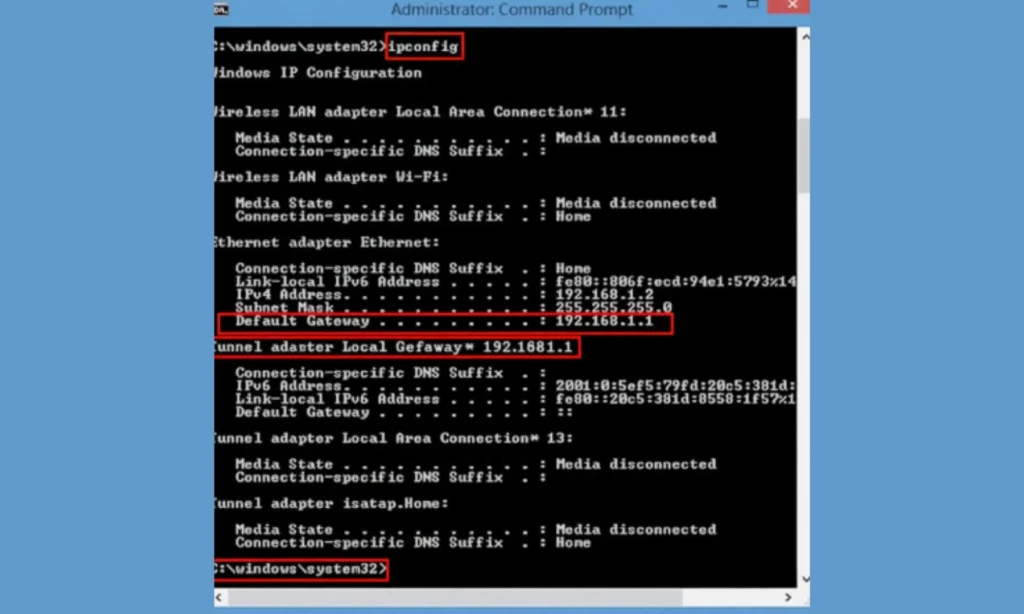
Via Command Prompt (Windows)
- Press Windows key plus R and type cmd.
- Press Enter to open the Command Prompt.
- Type ipconfig and press Enter.
- Find the Default Gateway under your active network.
This number is the IP address you need to use in your browser.
Why Your Router IP May Be Different
Routers from different brands and internet providers may use different private IP ranges. Common alternatives include:
- 192.168.0.1
- 192.168.10.1
- 192.168.15.1
- 192.168.8.1
- 10.0.0.1
If 192.168.1.1 does not work, checking the correct IP using the steps above will help you access your admin panel without confusion.
Commonly Mistyped IP Addresses
Many users enter the wrong IP address when trying to access their router login page. These mistakes usually happen because numbers look similar to letters, or extra characters are added by accident. Below is a list of the most common mistyped versions of 192.168.1.1, along with the correct format you should use.
Common Mistakes and Correct Versions
Mistyped IP Address | Why It Is Incorrect | Correct Version |
192.168.l.l | The letter “l” is used instead of the number “1”. | 192.168.1.1 |
192.168.1.1.1 | Extra numbers are added. IPs cannot have five sections. | 192.168.1.1 |
192.168.1o.1 | The letter “o” is used instead of zero. | 192.168.10.1 or 192.168.1.1, depending on the router |
Local IP addresses do not use “www” or “.com”. | ||
http//192.168.1.1 | Missing the colon after “http”. | |
192.168.1.256 | The number 256 is outside the valid IP range. | 192.168.1.1 |
Why These Mistakes Happen
- Confusing the number 1 with the letter l
- Confusing the number 0 with the letter o
- Adding extra digits
- Typing the IP like a website address
- Forgetting required characters in the URL
Always make sure you type the IP exactly as shown: http://192.168.1.1. Even one incorrect character will prevent the router login page from loading.
How to Change Your Router's IP Address (TP-Link, D-Link, NETGEAR)
Changing your router’s default IP address can improve security and help prevent network conflicts. The steps vary slightly by brand, but the process is straightforward for most routers.
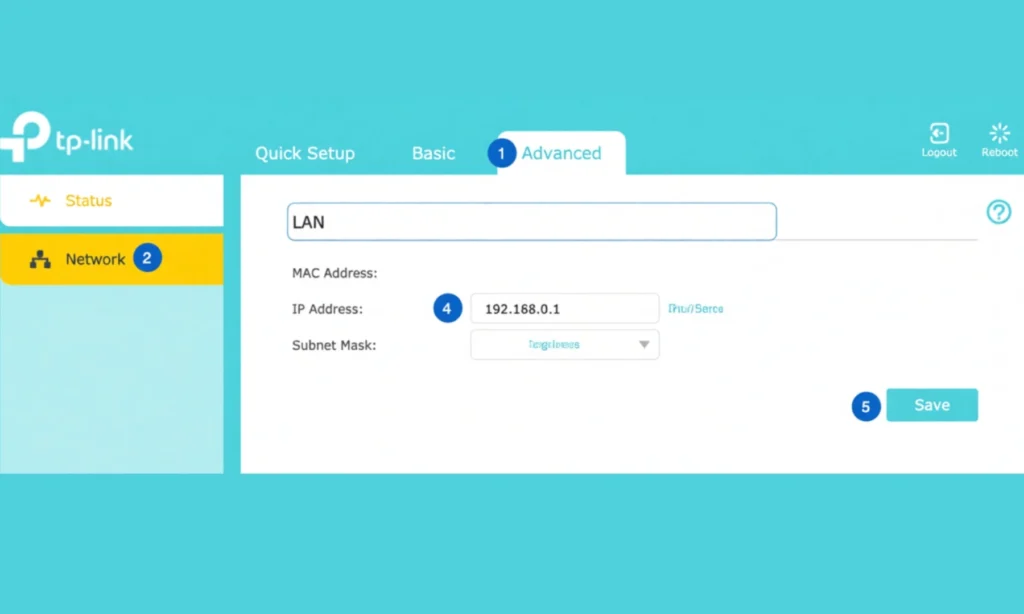
TP-Link Routers
- Log in to your TP-Link admin page using http://192.168.1.1 or http://tplinkwifi.net.
- Enter your username and password.
- Go to Network, then select LAN.
- Find the IP Address field and replace the current address with the new one.
- Click Save.
- The router will reboot and accept the new IP.
- Use the new IP in your browser to log in again.
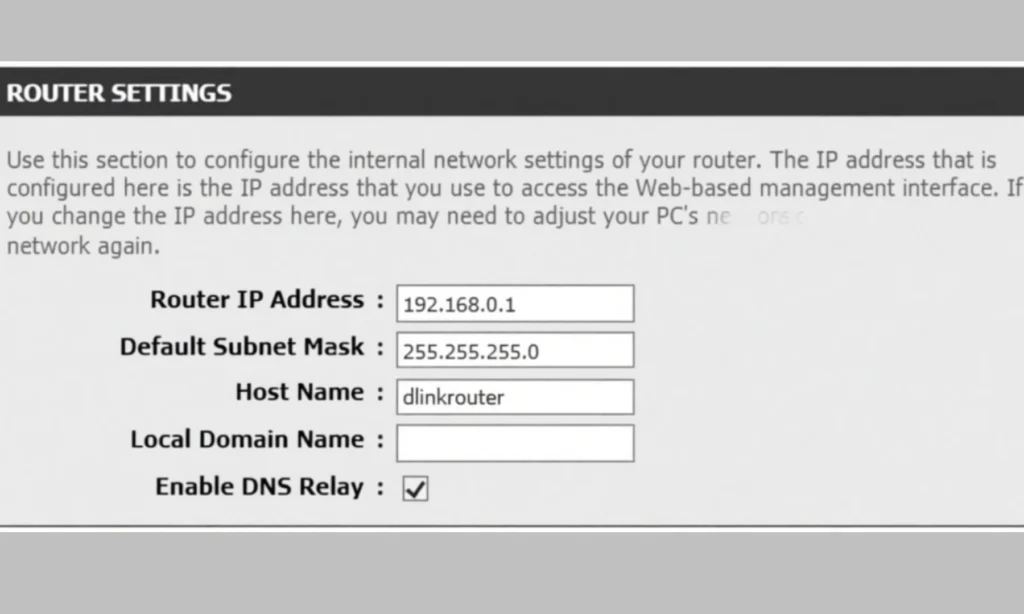
D-Link Routers
- Connect to your router and open your browser.
- Visit http://192.168.1.1.
- Log in using the default or previously set credentials.
- Navigate to Setup, then choose Network Settings.
- Find the Router IP Address field in the LAN section.
- Enter the new IP address you want to use.
- Click Save Settings.
- The router will restart and apply the new address.
- Reconnect using the new IP in your browser.
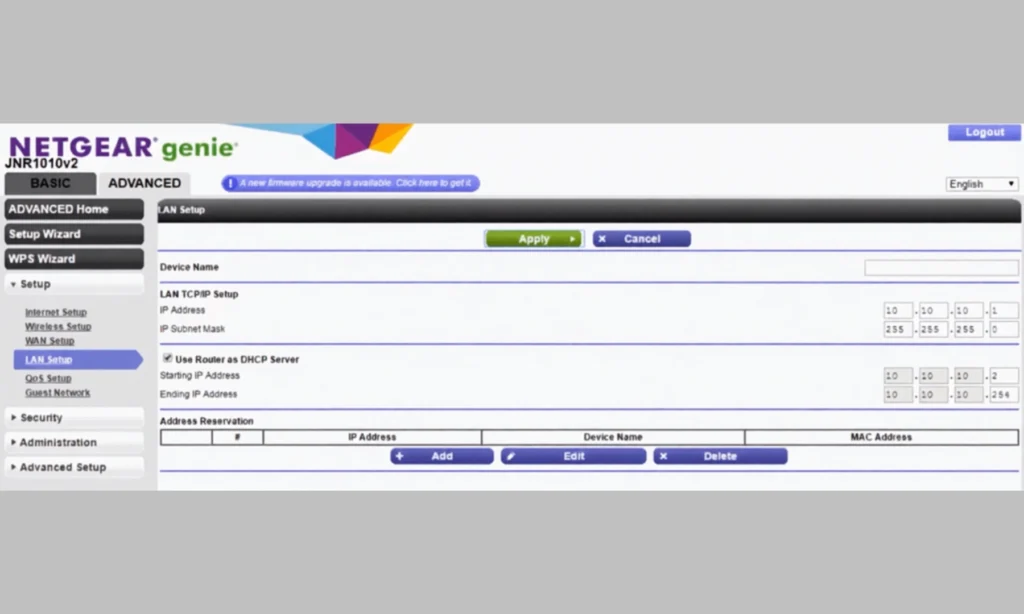
NETGEAR Routers
- Open your browser and go to http://routerlogin.net.
- Log in using your admin credentials.
- Go to Advanced.
- Select Setup, then choose LAN Setup.
- Locate the LAN TCP IP Setup section.
- Change the IP Address to your new value.
- Click Apply.
- The router will reboot and start using the new IP.
- Log in again using the updated address.
Important Notes
- Always save your new IP address so you do not forget it.
- Once the IP address is changed, the old one will no longer work.
- Choose an IP within a valid private range to avoid conflicts.
- If a mistake causes your connection to break, perform a factory reset to restore default settings.
Complete Router Configuration Guide for Fast and Secure Internet
Proper router configuration is essential for getting the best internet speed, stability, and protection against unauthorized access. The steps below cover the most important settings you should adjust after logging in to your router at 192.168.1.1.
1. Change the Admin Username and Password
Update the default login credentials to protect your router from unauthorized access. Choose a strong username and a secure password with a mix of letters, numbers, and symbols.
2. Change the WiFi Name (SSID)
Go to the wireless settings and rename your WiFi network. A unique SSID helps avoid confusion with nearby networks.
3. Change the WiFi Password
Set a strong WiFi password to prevent unknown devices from connecting. Avoid simple or common passwords.
4. Enable WPA2 or WPA3 Encryption
Open the wireless security section and select WPA2 or WPA3 for maximum protection. These encryption types keep your network safe from attacks.
5. Ensure DHCP Is Enabled
DHCP automatically assigns IP addresses to connected devices. Ensure this feature is enabled to avoid network conflicts and connection issues.
6. Select the Correct Bandwidth and Network Type
Choose the correct connection type depending on your internet provider. Options include: PPPoE Dynamic IP Static IP Enter any details provided by your ISP correctly to ensure a stable connection.
7. Set Up Parental Controls
Enable parental controls to manage internet access for specific users or devices. This helps block adult content or set usage schedules.
8. Set Up a Guest Network
A guest network allows visitors to use your WiFi without accessing your main network. This improves both privacy and security.
9. Use MAC Address Filtering
MAC filtering lets you choose which devices are allowed to connect. This adds an extra layer of control over your network.
10. Update the Firmware
Check the firmware section in the router settings and install the latest version provided by the manufacturer. Updated firmware improves security and performance.
11. Position Your Router for the Best Signal
Place your router in a central and open location. Avoid hiding it in corners, behind furniture, or near thick walls. A good position improves coverage and speed.
12. Verify Speed with an Internet Speed Test
After configuring your router, run a speed test to confirm your connection is stable and performing as expected.
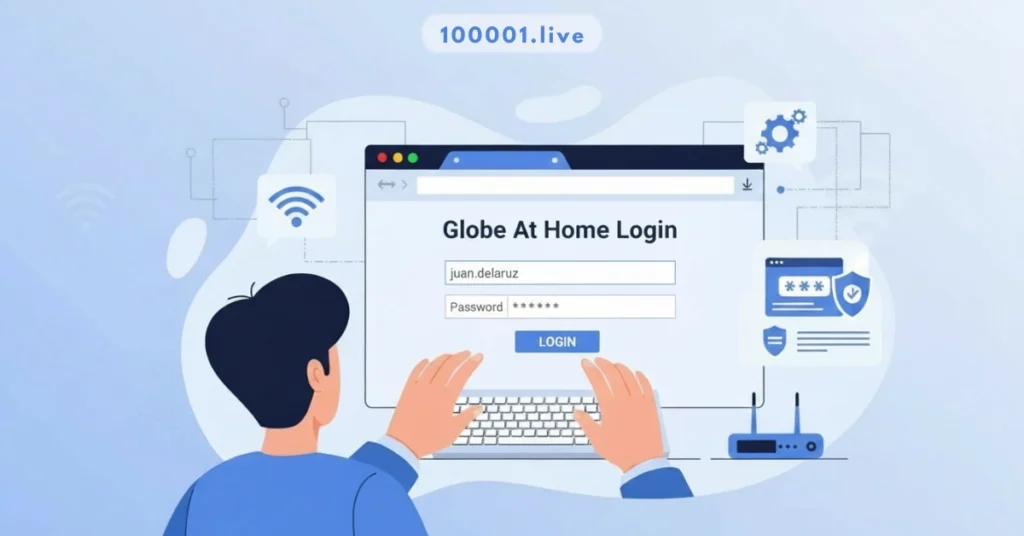
PLDT Router Login Guide (192.168.1.1, 192.168.15.1, 192.168.1.1/fh)
PLDT routers use several different login addresses depending on the model, region, and firmware version. The most common IPs are 192.168.1.1, 192.168.15.1, and 192.168.1.1/fh. Using the correct one lets you access the admin interface, where you can change your WiFi name, password, and other network settings.
Default PLDT Login Credentials
Here are the common usernames and passwords used in PLDT routers:
Usernames:
- admin
- pldtadmin
- user
Passwords:
- admin1234
- 1234
- admin
If none of these work, check the sticker on the back of your modem for the correct login details.
Step-by-Step Guide to Log In to Your PLDT Router
1. Connect to the PLDT Network
Make sure your device is connected to your PLDT WiFi or plugged in using a LAN cable. You cannot access the login page if you are not connected to the router.
2. Open Your Browser
Launch any browser such as Chrome, Firefox, Safari, or Edge.
3. Enter the Correct Login Address
Type one of the following into the address bar:
Press Enter. One of these should load your PLDT admin login page.
4. Enter Your Username and Password
Use the default credentials listed above, or check your router sticker for the exact login details.
Click Login to enter the admin dashboard.
Why Some PLDT Routers Use Different IP Addresses
PLDT has multiple hardware versions and firmware updates across its DSL, Fiber, and Home WiFi routers. Different models use different gateways. Common reasons include:
- Fiber modems often use 192.168.15.1
- Older DSL routers use 192.168.1.1
- Newer firmware builds use 192.168.1.1/fh
- Some customized ISP configurations assign unique gateway IPs
If 192.168.1.1 does not load, try the alternatives listed above.
How to Change PLDT WiFi Name and Password
1. Log In to the Admin Page
Use the correct IP and enter your credentials.
2. Navigate to the Wireless Settings
Go to Network, then find WLAN or Wireless settings.
Select Basic or security settings depending on your router model.
3. Change the SSID (WiFi Name)
Find the SSID field and enter your new network name.
4. Change the WiFi Password
Look for the Password or Passphrase field.
Enter a new, strong password that is difficult to guess.
5. Save the Settings
Click Save or Apply.
Your router may restart, and devices will need to reconnect using the new name and password.
How to Reset PLDT Modems
If you forget your login password or your settings stop working, you can reset the modem to factory defaults.
Reset Button Location
The reset button is a small pinhole usually located at the back of the router.
How to Reset
- Use a pin or paperclip.
- Press and hold the reset button for 10 to 15 seconds.
- Wait until the router restarts completely.
What Happens After Reset
- All settings return to factory defaults.
- WiFi names and passwords reset
- Admin login credentials return to their default value.s
- You must reconfigure your network from the beginning.ng
Log In After Reset
After the reboot, open your browser and enter the correct IP again.
Use the default credentials printed on the router label.
Common Issues and Troubleshooting for 192.168.1.1
If you cannot access the 192.168.1.1 login page, the problem is usually due to a connection issue, a mistyped IP address, or incorrect router settings. Below are the most common causes and how to fix them.
1. Typing Errors
Make sure you are entering the IP correctly. Avoid common mistakes such as 192.168.l.l, 192.168.1.1.1, or adding www or .com.
Correct format: http://192.168.1.1
2. Not Connected to the Router
You must be connected to the router through WiFi or an Ethernet cable. If you are on mobile data, a neighbor’s WiFi, or a hotspot, the login page will not load.
3. Browser Cache Problems
Cached data can cause the login page to load incorrectly. Clear your browser cache, or try opening the IP in Incognito Mode or in a different browser.
4. VPN or Proxy Blocking Local IP
VPNs and proxies reroute your traffic, which stops you from accessing local addresses. Turn off your VPN, disable any proxy settings, then try again.
Extra security Tips for Protecting Your WiFi
Securing your WiFi network is essential to prevent unauthorized access, protect your personal data, and maintain fast internet speeds. Here are the most effective security practices every user should follow.
Use a Strong Password
Create a password with a mix of uppercase and lowercase letters, numbers, and symbols. Avoid common words, birthdays, or simple patterns.
Disable WPS
WPS can make it easier for attackers to gain access to your network. Turn it off in your wireless security settings to reduce vulnerabilities.
Update Firmware Regularly
Routers receive firmware updates that fix bugs and improve security. Check for updates in the administration or system settings section.
Hide SSID or Keep It Visible
Hiding your SSID can offer privacy, but it does not provide absolute security.
Pros of hiding: less visible to casual users.
Cons of hiding: advanced attackers can still detect it, and your devices may reconnect less reliably.
Most users should choose a unique SSID and secure it with a strong password.
Use MAC Address Filtering
MAC filtering allows only approved devices to connect. Use this feature for strict control, but remember it can be inconvenient when adding new devices.
Enable a Guest Network
A guest network keeps visitors separate from your main devices. Use a different password and restrict access to internal resources.
Block Unknown Devices
Check the list of connected devices in your router settings. Remove or block any device you do not recognize.
Keep Your Router in a Central Location
A central spot improves coverage and reduces weak signal areas. Avoid placing the router behind thick walls, inside cabinets, or near large appliances.
Frequently Asked Questions
What is 192.168.1.1 used for?
It is a private IP address used to access the router’s admin panel, where you can change WiFi settings and manage your network.
How do I log in to 192.168.1.1?
Connect to the router, open your browser, and enter http://192.168.1.1. Then enter your username and password.
What if the IP does not load?
You may be mistyping it, using the wrong IP, or not connected to the router. Try alternative gateways, such as 192.168.0.1, or check your device’s network settings.
How do I find my router's IP address?
Check your network settings on Windows, macOS, iPhone, or Android. The Default Gateway or Router field shows the correct IP.
What are the best router settings for speed?
Enable WPA2 or WPA3, use the 5 GHz band if available, update firmware, choose a good channel, and place the router in a central location.
How do I change my WiFi password?
Log in to your router, go to wireless settings, select your SSID, and update the password field. Save the changes.
How do I reset my router?
Press and hold the reset button on the back for ten to fifteen seconds until the router restarts. This restores factory settings.
How do I access my router on a phone?
Connect to your WiFi, open your mobile browser, and type http://192.168.1.1.
What is 192.168.l.l?
This is a common typing mistake. It contains the letter L instead of the number 1. The correct IP is 192.168.1.1.
What if my router uses 192.168.0.1 instead?
Some routers use different default gateways. Type http://192.168.0.1 in your browser and log in the same way.