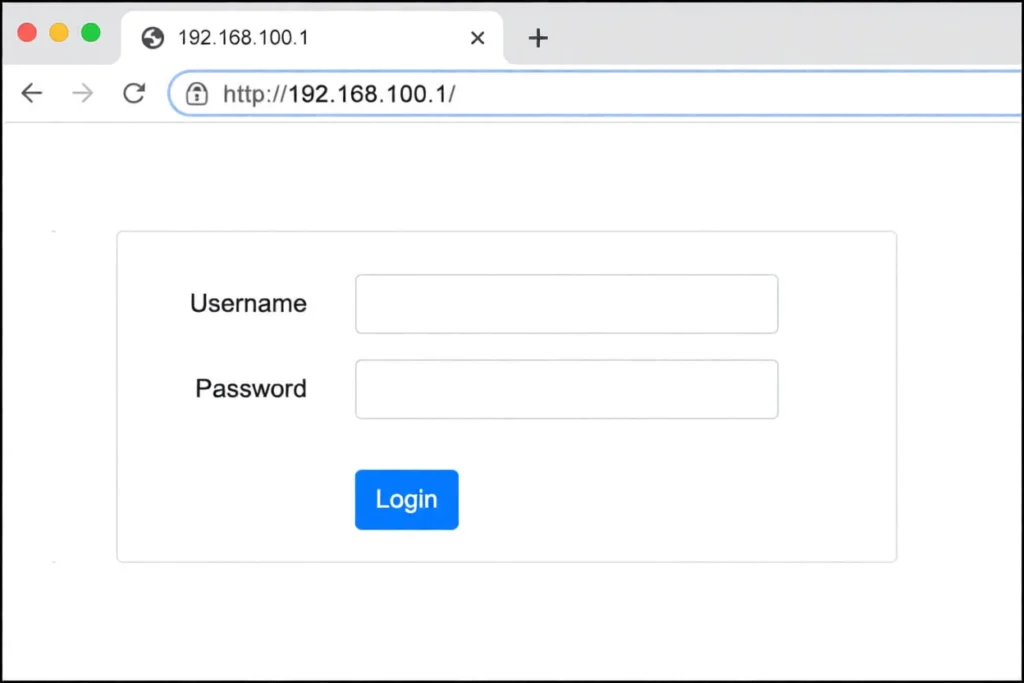
192.168.100.1
Typing 192.168.100.1 into your browser takes you straight to your router’s control center. This private IP address is commonly used as the default gateway for many routers and modem router devices, providing access to the admin panel where you can manage Wi-Fi settings, security options, connected devices, firmware updates, and more.
Since it falls within the private IPv4 range, 192.168.100.1 only works on your local network. It is widely used by brands such as Huawei, Arris, Motorola, TP-Link, Netgear, D-Link, Ubee, PLDT, Converge, Globe, and several others that ship their routers with this gateway pre-configured.
Quick Guide for 192.168.100.1 Login Guide
Before logging in to the 192.168.100.1 admin panel, make sure everything is ready on your end. The following requirements ensure a smooth setup experience:
1. A device connected to the router or modem
You can use:
- Wi Fi
- Ethernet cable (recommended for first-time setup or when changing necessary settings)
2. A modern web browser
Any updated browser with HTML5 support will work. For best results, use:
- Google Chrome
- Mozilla Firefox
- Microsoft Edge
- Safari
Older or outdated browsers may fail to load the router interface properly.
3. Local network connection only
The router login page only works when your device is connected directly to the router network. It will not open over mobile data or on a different Wi-Fi network.
Step-by-Step Login Guide
Follow these steps exactly to access the 192.168.100.1 router login page:
- Connect to your router
- Join the router’s Wi Fi network, or
- Plug in an Ethernet cable to your laptop or PC
- Disable VPN or proxy
Temporary disabling helps avoid routing conflicts that can block local IP access. - Open your preferred web browser
Use a new tab for a fresh session. - Type the correct IP address
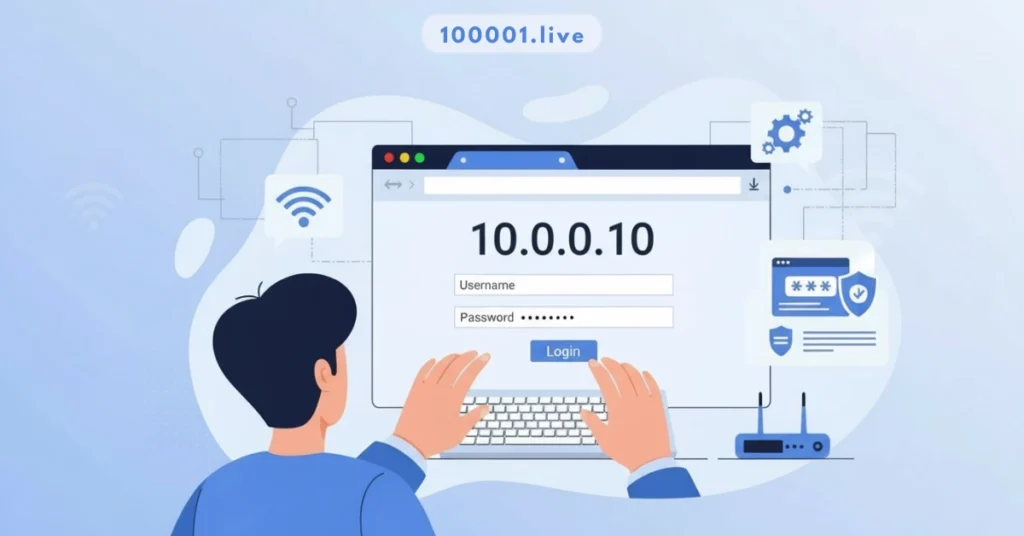
Enter http://192.168.100.1 in the browser’s address bar.
Do not type it in the search field.
- Press Enter
Wait for the router’s login screen to load. - Enter the admin username and password
You will see fields for the router’s login credentials.
These are usually printed on the label underneath your router.
After entering the correct information, you will be taken to the whole admin dashboard, where you can configure everything related to your network.
Relevant IP Adresses
-
Most Piso WiFi owners manage their rates through the 10.0.0.0.1 piso wifi portal login.
-
Find similar technical gateways in our router IP address section.
-
This IP is commonly paired with the 192.168.254.254 address on Philippine ISP networks.
Typical Default Login Credentials for 192.168.100.1
If you have never changed your router’s login information, it will likely be using the default factory settings. These are the most common combinations:
- Username: admin
Password: admin - Username: admin
Password: password - Username: user
Password: user - Username: root
Password: root
Below are typical examples used by specific brands:
|
Router Brand |
Default Username |
Default Password |
|
admin |
admin |
|
|
Netgear |
admin |
password |
|
Arris |
(blank) |
(blank) or admin/password |
|
Huawei |
root or admin |
admin |
|
PLDT |
admin |
1234 or admin |
|
FiberHome (Converge) |
admin |
admintelecom |
If none of these work, your ISP may have changed the login details, or someone may have updated them previously.
What to Do If the Login Page Does Not Load
If the 192.168.100.1 page fails to open, perform the following quick checks:
- Recheck the IP address
You must type 192.168.100.1 exactly.
Common mistakes include:
- 192.168.I00.1 (using the letter I)
- 192.168.l00.1 (using a lowercase L)
- Missing dots such as 1921681001
- Confirm that your device is connected to the router
If you are on mobile data or another Wi Fi network, the page will never load. - Try a different web browser
Some browsers cache old sessions. Switching to another browser often fixes the issue. - Try a private or incognito window
This bypasses cached pages and cookies.
Visit our 10.10.10.1 guide to adjust router settings, solve login problems, and troubleshoot quickly.
How to Confirm Your Router's IP (If 192.168.100.1 Doesn't Work)
Sometimes 192.168.100.1 isn’t the correct gateway for your network, even if you saw it in a guide somewhere. Every router or modem can use a different default IP, so the best move is to check what your device is actually using instead of guessing.
Below are easy, device-by-device methods to find your real router IP address.
Check the Router Label or Manual
The fastest offline method is to check the router or modem itself.
Where to look:
- Turn the device around and check:
- The back
- The bottom
- Or sometimes the side
- The back
- You’ll usually find a sticker/label with information such as:
- Default IP address (e.g., 192.168.100.1, 192.168.1.1, 192.168.0.1)
- Default username (admin, user, root, etc.)
- Default password (admin, password, blank, serial number, etc.)
- Default Wi-Fi name (SSID)
- Default Wi-Fi password/key.
- Default IP address (e.g., 192.168.100.1, 192.168.1.1, 192.168.0.1)
If your router came with a printed quick-start guide or user manual, the default IP is also often listed there under something like:
- “Default Gateway”
- “Login Address”
- “Access the Web Interface”
If the label shows a different IP (for example, 192.168.1.1 instead of 192.168.100.1), that’s the one you must enter in your browser.
Forgot 192.168.100.1 Username or Password? Recovery and Reset Guide
Forgetting your router’s login credentials is extremely common. If you cannot access the admin panel at 192.168.100.1, you can recover or reset the information using the steps below.
First Steps Before Resetting
Before doing a complete reset, try the following quick checks. Many users can log in again without resetting their router settings.
- Check the router sticker or manual
Most routers have a label on the back or bottom showing:
- Default username
- Default password
- Default IP address
If your admin credentials were never changed, these details will work.
- Try commonly used credentials
If the sticker is missing or unreadable, try the standard combinations used on many routers:
- admin/admin
- admin/password
- admin / 1234
- user/user
- root/admin
These are basic factory defaults used by several brands.
- Check saved login credentials
If you logged in before, your browser or password manager might still have the credentials stored.
Try checking:
- Browser saved passwords
- Password manager apps
- Notes saved on your device
This often solves the problem without requiring a router reset.
Soft Recovery Options
Some routers or ISPs provide recovery features that do not erase your settings.
Possible options include:
- Password hint displayed on the login page
- Local password recovery tool in the router interface
- ISP mobile application (for example, PLDT, Converge, Globe apps)
- ISP customer portal, where login information may be visible
These options vary widely depending on the router model and provider.
Complete Factory Reset Hard Reset
If none of the recovery options work, you must perform a complete factory reset. This returns the router to its original state.
Important reminder:
A factory reset removes all custom settings, including:
- SSID and Wi Fi password
- Admin password
- Port forwarding rules
- DHCP settings
- Parental controls
- Firewall rules
After the reset, you must set up the router again.
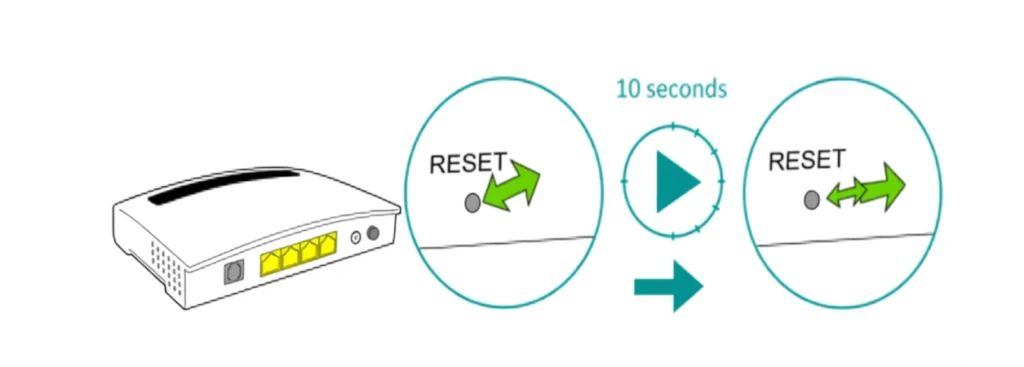
Steps to perform a hard reset
- Keep the router powered on
The reset will not work if the device is turned off. - Locate the reset button
This is usually a small pinhole labeled “RESET” found on the back or underside of the router. - Use a sharp object
Insert a pin, paperclip, or needle into the reset hole. - Hold the button for 10 to 15 seconds
Keep pressing until the LEDs blink or the router restarts. - Wait for the router to reboot
This may take 30 to 60 seconds. - Log in again
Open a browser and go to:
- http://192.168.100.1
or - http://192.168.1.1 (some models switch to different defaults)
Enter the factory default username and password listed on the sticker or manual.
Reconfigure Your Router After Reset
Once the router returns to its default settings, it needs to be reconfigured.
Essential steps include:
- Set your SSID and Wi Fi password again
Create a unique name for both 2.4 GHz and 5 GHz bands. - Change the admin username and password
Do not leave the router on its default admin credentials. - Restore advanced configurations
If you were using any of the following, you must set them up again:
- Port forwarding
- DHCP reservations
- Static IP assignments
- Parental or access controls
- Firewall rules
- Guest Wi Fi
- Save the settings and reboot if required
Most routers will ask for confirmation before applying changes.
Find the Router IP (Default Gateway) on Windows
On Windows, the router’s IP is shown as the Default Gateway.
Method 1: Using Command Prompt (cmd)
- Open Run
- Press Windows + R on your keyboard.
- Press Windows + R on your keyboard.
- Type cmd and press Enter to open Command Prompt.
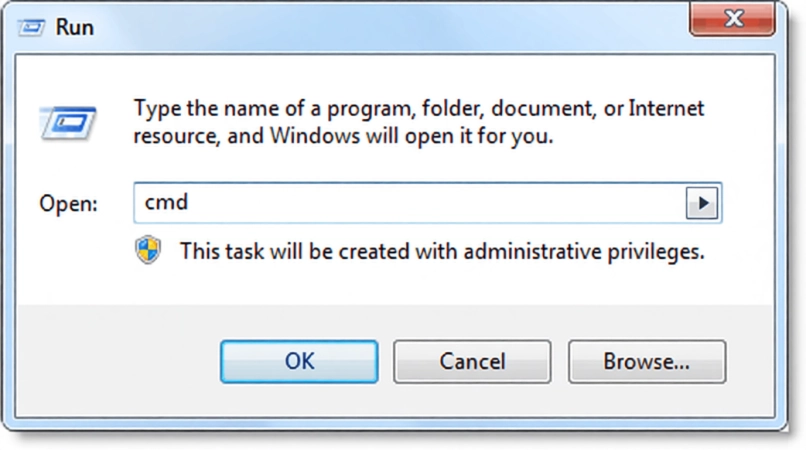
In the black Command Prompt window, type:
ipconfig
- and press Enter.
- Look for the network adapter you’re actually using:
- If you’re on Wi-Fi: look under Wireless LAN adapter Wi-Fi (or similar).
- If you’re on cable, look under Ethernet adapter.
- If you’re on Wi-Fi: look under Wireless LAN adapter Wi-Fi (or similar).
- Find the line labeled Default Gateway.
- It will show something like:
- 192.168.100.1
- 192.168.1.1
- 192.168.0.1
- Or another local IP.
- 192.168.100.1
- It will show something like:
That Default Gateway value is the IP address of your router. Use that address in your browser instead of assuming it’s 192.168.100.1.
Method 2: Using Network & Sharing Center (GUI)
- Right-click the network/Wi-Fi icon in the taskbar (bottom-right).
- Click Open Network & Internet settings.
- Click Advanced network settings or Change adapter options (depending on the Windows version).
- Right-click your active connection (Wi-Fi or Ethernet) and select Status.
- Click Details….
- In the list, find IPv4 Default Gateway.
Again, that value is your router’s IP.
Find Router IP on macOS
On a Mac, the router’s IP address is displayed simply as ‘Router’.
- Click the Apple menu () in the top-left corner.
- Select System Settings (or System Preferences on older macOS).
- Go to Network.
- In the left sidebar, select your active connection:
- Wi-Fi (if connected wirelessly)
- Ethernet (if using a cable)
- Wi-Fi (if connected wirelessly)
- Click Details… or Advanced… (depending on macOS version).
- Go to the TCP/IP tab.
- Look for the field labeled Router.
You’ll see something like 192.168.100.1, 192.168.1.1, or another private IP. That is the address you should type into your browser’s address bar.
Find Router IP on Android
On Android, the router’s IP address shows up as the Gateway, or sometimes just under “Router”.
Note: Menu names can differ slightly depending on the phone brand and Android version, but the steps are similar.
- Open Settings.
- Tap Wi-Fi (or Network & Internet > Internet/Wi-Fi).
- Make sure you’re connected to your home network.
- Tap the name of the connected Wi-Fi network.
- On some phones, you may need to tap a small gear icon ⚙️ or Details button next to it.
- On some phones, you may need to tap a small gear icon ⚙️ or Details button next to it.
- Look for:
- Advanced, More, or IP settings.
- Advanced, More, or IP settings.
- Find the field labeled:
- Gateway
- or Router
- Gateway
The number shown (e.g., 192.168.100.1 or 192.168.1.1) is your router’s IP address.
Find Router IP on iPhone (iOS)
On iPhone or iPad, everything you need is in the Wi-Fi settings.
- Open the Settings app.
- Tap Wi-Fi.
- Make sure you’re connected to your home Wi-Fi.
- Tap the small “i” icon next to your connected Wi-Fi network.
- Scroll down to the IPv4 Address section.
- Look for the line labeled Router.
This Router value (e.g., 192.168.100.1) is your router’s admin IP address. Type it exactly into your browser’s address bar.
When Your Router Uses a Different IP
If none of your devices show 192.168.100.1 as the gateway, then your router simply uses another default IP. That’s totally normal.
Common Alternative Router IPs
Some popular default gateway addresses include:
Different brands and ISPs choose different defaults, so don’t worry if yours doesn’t match 192.168.100.1 exactly.
What You Should Do
- Always trust the IP you see as “Default Gateway” or “Router” on your device.
- Enter that address in your browser (for example, http://192.168.1.1).
- If you have multiple routers (for example, an ISP modem and your own router), each can have its own local IP address.
Changing Wi Fi Name (SSID) and Password via 192.168.100.1
Why You Should Change Your SSID and Wi Fi Password
Leaving your router on its default settings makes your network easier to identify and easier to attack. Most manufacturers ship millions of units with identical SSIDs and predictable passwords, allowing anyone nearby to guess the credentials or look them up online.
Benefits of updating your SSID and password include:
Better security
A custom network name and a strong password help prevent unauthorized access. Default names like “Huawei WiFi” or “PLDT Home” are easy to target.
More precise identification of your network
Personalized SSIDs help you quickly recognize your Wi Fi when multiple networks appear nearby. This is especially useful in apartments or congested areas.
Separate naming for dual-band routers
If your router supports both 2.4 GHz and 5 GHz, using names like “MyHome2G” and “MyHome5G” makes it easier to choose the right band for your devices.
General Steps for Any Router Brand
These steps apply to most routers that use 192.168.100.1 as the default gateway.
- Log in to your router
Open a browser and go to
http://192.168.100.1
Enter the admin username and password. - Navigate to Wireless settings
Look for menu labels such as:
- Wireless
- Wi Fi
- WLAN
- Wireless Settings
- Change the SSID
Update the Wi Fi name for:
- 2.4 GHz
- 5 GHz (if available)
Each band can have its own SSID.
- Set the correct security Mode
Choose:
- WPA2 PSK
- WPA3 (if supported)
Avoid older options like WEP.
- Create a strong Wi Fi password
Use 12 to 16 characters with a mix of:
- Uppercase letters
- Lowercase letters
- Numbers
- Symbols
- Save or apply the settings
Your router may reboot. Your devices will disconnect and must reconnect using the new password.
Brand Specific Walkthroughs
Below are easy-to-follow instructions for the most common router brands using 192.168.100.1.
TP Link
- Go to http://192.168.100.1 or http://192.168.1.1
- Log in using your username and password.
- Open Wireless
- Go to Wireless Settings
- Edit the Wireless Network Name (SSID)
- Go to Wireless security.
- Select WPA2 PSK or WPA3
- Enter your new Wi Fi password.
- Save the changes
Netgear
- Open a browser and go to http://192.168.100.1.
- Log in using the admin credentials.
- Go to Basic
- Select Wireless
- Edit the Name (SSID) field.
- Scroll to the security Option.
- Select WPA2 PSK [AES]
- Set the new Network Key.
- Save or apply the settings.
Arris
- Log in through http://192.168.100.1
- Open the Wireless tab.
- Find Network Name (SSID) and replace the default value.
- Update the WPA Password or Passphrase
- Save and wait for the confirmation.n
Huawei (PLDT, Converge, IndiHome, Globe, etc.)
- Go to http://192.168.100.1
- Log in with root, admin, or ISP-provided credentials.
- Open Wi Fi Settings or WLAN Basic Settings
- Configure both 2.4 GHz and 5 GHz separately.
- Change the SSID for each band.
- Set security Mode to WPA2 PSK or WPA3.
- Enter the new Wi Fi password.
- Save the settings
PLDT Fiber
- Log in at http://192.168.100.1
- Go to Network
- Select WLAN Settings
- Update your Wi Fi name and password.
- Save and reboot if the router instructs you to
FiberHome (Converge)
- Log in with
Username: admin
Password: admintelecom - Open WLAN Settings
- Select SSID Settings
- Change your Wi Fi name and key.y
- Save and reboot for the new configuration to apply.
Tips for Creating a Strong Wi Fi Password
A good Wi-Fi password protects your network while remaining easy for you to remember.
Helpful guidelines:
- Use at least 12 to 16 characters
- Mix uppercase and lowercase letters.
- Include numbers and symbols.
- Avoid personal details like names, birthdays, or phone numbers.
- Avoid simple patterns like 12345678 or password123
- Use a password manager for maximum security without memorizing everything.
Full Router Setup and Configuration Using 192.168.100.1
Setting up your router correctly ensures strong security, fast performance, and a stable network for all your devices. The steps below cover everything from first-time installation to advanced customization using the 192.168.100.1 admin interface.
First Time Setup Out of the Box
If your router is brand new or you have just reset it, follow these steps for proper initial installation.
- Make the physical connections
- Connect the modem to the router’s WAN or Internet port.
- Connect your computer or laptop to the router using an Ethernet cable.
(Wired setup is more reliable for first-time configuration)
- Power on both devices
Wait until the router’s LEDs stabilize. - Access the setup wizard
Open any browser and visit:
http://192.168.100.1
Most routers automatically launch a setup wizard that guides you through basic settings such as:
- Internet connection type
- Wi Fi setup
- Admin password creation
- Follow your ISP’s instructions if provided
Some internet providers require PPPoE credentials or custom settings, which are usually included in your installation documents.
Basic Wireless Setup
Your wireless setup determines how well your devices connect to the network.
- Assign SSIDs for each band
Routers with dual-band connections support:
- 2.4 GHz
- 5 GHz
Use clear names for each, for example: - HomeWifi2G
- HomeWifi5G
- Choose the correct security Mode
For strong protection, always select:
- WPA2 PSK
or - WPA3 (if available)
Avoid WEP or WPA, as these are outdated and insecure.
- Create a strong Wi Fi password
Use at least 12 to 16 characters that include:
- Uppercase letters
- Lowercase letters
- Numbers
- Symbols
Wi Fi Channels and Bandwidth
Understanding channels helps reduce interference and improve performance.
What are Wi Fi channels?
Channels are the smaller frequency blocks within each Wi-Fi band. Too many routers sharing the same channel can cause slow speeds and drops.
Recommended settings:
2.4 GHz
Use one of the three non-overlapping channels:
- Channel 1
- Channel 6
- Channel 11
These reduce interference from nearby routers and household devices.
5 GHz
This band has more channels and less interference.
You can use wider bandwidth options like:
- 40 MHz
- 80 MHz
These allow faster speeds but may reduce range.
Band steering or Smart Connect
Many routers support automatic switching between 2.4 GHz and 5 GHz. Enabling this helps devices automatically connect to the best band.
LAN and DHCP Settings
These settings control how your router organizes and assigns IP addresses inside your home network.
- Router LAN IP
Most routers set to 192.168.100.1 use it as the main LAN gateway. - Subnet configuration
Common subnet for home networks:
255.255.255.0 - DHCP server
Your router is the device that assigns IP addresses to connected devices.
Options include:
- Turn DHCP on or off
- Modify the DHCP range.
For example:
192.168.100.2 to 192.168.100.254
- Static IPs and DHCP reservations
Use these for devices that need stable IP addresses, such as:
- Printers
- CCTV cameras
- NAS storage
- Servers
This prevents IP conflicts and ensures stable connections.
MAC Address Filtering and Device Control
This feature allows you to limit or control which devices can access your Wi Fi.
How MAC filtering works:
Every device has a unique MAC address. You can:
- Allow only selected MAC addresses to connect
or - Block unknown or suspicious devices.
This is useful for:
- Parental controls
- Preventing unauthorized access
- Limiting guest device access
Guest Network Setup
A guest network keeps your primary devices safe while providing internet access to visitors.
Benefits of a guest network:
- Separate SSID for guests
- Keeps visitors isolated from your personal devices
- Prevents access to shared files, printers, and home systems
You can also set:
- Speed limits
- Time schedules
- Device connection limits
- Separate SSID for guests
Firewall and security Options
Your router’s firewall adds an essential layer of protection.
Enable the following options if available in your model:
SPI firewall
Checks incoming and outgoing packets for threats.
Disable remote management
Turn off access from WAN or external networks.
This stops attackers from accessing your router from outside your home.
Basic DOS protection
Helps prevent flood attacks and network overload attempts.
Quality of Service and Bandwidth Management
Quality of service helps prioritize certain types of internet traffic.
Examples of what you can prioritize:
- Gaming
- Video streaming
- VoIP calls
- Work applications
This prevents network congestion and ensures better performance for critical tasks.
Firmware Updates and Backup or Restore
Firmware updates keep your router stable and secure.
- Check your current firmware version
Visit the router interface and find the firmware section to see if updates are available. - Update firmware safely
- Do not unplug the router during the update.
- Use a wired connection if possible.
- Download firmware only from the official brand website.
- Backup configuration
Before updating, save your current settings so you can restore them if needed.
Backups include:
- SSIDs
- Passwords
- DHCP settings
- Port forwarding rules
- Firewall configurations
Restoring from a backup is much easier than reconfiguring everything manually.
Port Forwarding and Opening Ports Using 192.168.100.1
Port forwarding allows you to make specific devices or applications inside your home network accessible from the internet. This section explains what it is, why it is used, and how to configure it safely through the 192.168.100.1 router dashboard.
What Is Port Forwarding
Port forwarding is a router feature that sends incoming traffic from the internet to a specific device on your local network.
When an app or service needs outside access, the router must know exactly which device should receive that traffic. Port forwarding creates that path.
It is required because routers hide their internal IP addresses, and only the router’s public IP address is visible on the internet. Forwarding a port creates a dedicated entry point for a device on the network.
Common Use Cases
Many apps and devices rely on open ports to work correctly. Some examples include:
Gaming consoles and PC gaming
- PlayStation, Xbox, Nintendo Switch, and PC multiplayer games often require specific ports for stable online sessions.
CCTV and NVR systems
- Remote monitoring apps need open ports to view cameras from outside the home.
Peer-to-peer applications
- Torrent clients and file-sharing software use open ports to communicate more quickly.
Home servers and remote access tools
- Web servers, FTP servers, and remote desktop applications need open ports to allow external traffic.
General Steps to Open Ports on 192.168.100.1
The exact menu names vary by router brand, but the process is essentially the same for all devices.
Step 1: Log in to your router
Open your browser and visit:
http://192.168.100.1
Enter your admin username and password.
Step 2: Navigate to port forwarding settings
Look for one of these sections depending on your router brand:
- Advanced settings
- NAT
- Port forwarding
- Virtual server
- Applications and gaming
Step 3: Add a new port rule
You will usually see fields such as:
Service Name
A label so you remember what the rule is for (example: PlayStation, CCTV, Minecraft server).
External Port or Port Range
Ports required by the app, such as 80, 443, 25565, 8080, or a range like 5000-5005.
Internal IP Address
The IP address of the device receiving the traffic.
Example:
192.168.100.25
Protocol
Select:
- TCP
- UDP
- Both
Some apps require both.
Step 4: Save and apply settings
Some routers require a restart before the new rule becomes active.
Security Considerations
Port forwarding can improve performance, but it must be done with caution. Opening unnecessary ports exposes your network to potential threats.
Only open ports you truly need
Avoid forwarding ports for unused apps or temporary services.
Use a static IP address.
Assign the device a fixed IP so port forwarding always points to the correct destination.
Secure every exposed service.
Use strong passwords for:
- CCTV
- Remote desktop
- Gaming profiles
- Servers
Consider using a VPN.
A VPN is a safer alternative for remote access because it avoids exposing ports directly to the internet.
Troubleshooting: 192.168.100.1 Not Working or Unable to Access Admin Page
If you cannot reach the admin panel at 192.168.100.1, the issue is usually simple and easy to fix. Below is a complete checklist covering every possible cause, from basic typing mistakes to deeper network conflicts.
Incorrect or Mistyped IP Address
One of the most common reasons the login page does not load is a typing error.
Frequent mistakes include:
- 192.168.I00.1 (letter I instead of number 1)
- 192.168.l00.1 (small L instead of 1 or 0)
- 192.168.1001 (missing dot)
- 192.168.1.1 (a completely different gateway)
- 1921681001 (typed without separators)
Always confirm:
- The IP has four groups of numbers
- Dots separate each group.
- You are typing into the browser address bar, not the search bar.
Not Connected to the Router Network
If your device is not connected to the router that uses 192.168.100.1, the login page will not open.
Possible issues:
- Connected to a different Wi Fi network
- Using mobile data instead of Wi Fi
- The Ethernet cable is plugged into the wrong port.
- VPN, proxy, or office tunnel is active and blocking local connections
Fix:
Connect directly to the correct network and temporarily turn off VPN or proxy.
192.168.100.1 Is Not Your Router's IP Address
Not every router uses this IP. Your device might be using:
- 192.168.1.1
- 192.168.0.1
- 10.0.0.1
- 192.168.254.254 (common for some ISPs)
To confirm the correct gateway:
- Use ipconfig on Windows
- Check TCP/IP settings on macOS
- Check “Router” in your phone’s Wi Fi details.
(Refer back to your IP discovery steps in Section 3.)
Router or Modem Is Unresponsive or Frozen
Sometimes the router crashes and stops responding internally.
Quick fix:
- Keep it powered on
- Unplug it from the outlet.
- Wait 10 to 30 seconds.
- Plug it back in and reboot fully.
Also, check the LED lights:
- No internet
- Power blinking
- Wi Fi disabled
Any of these may indicate an internal issue or boot failure.
Browser Cache, DNS, and Extension Problems
Your browser can interfere with access due to stored data or extensions.
Try these:
- Open a private/incognito window
- Clear cache and cookies
- Try another browser (Chrome, Edge, Firefox, Safari)
- Flush DNS (Windows: ipconfig /flushdns)
- Disable ad blockers, script blockers, or security extensions
Some VPN extensions also block local IP access.
Firewall or Antivirus Blocking Local IP Access
Security software sometimes mistakenly blocks router login pages.
Try:
- Temporarily turning off the firewall or the antivirus web shield.
- Adding 192.168.100.1 to the “allowed” list
- Testing on a different device (another phone, laptop, tablet)
If it works on another device, the issue is local security software.
ISP-Locked Routers (PLDT, Globe, Converge, and Others)
Many ISP-provided routers have limited admin access. You may see:
- Only basic settings
- Missing menus
- Disabled options
- No “Admin” or “Advanced” section
In these cases, only your ISP can unlock full admin access.
Options:
- Contact your provider for “full admin” credentials.
- Use your own router connected behind the ISP modem for complete control.
- Request bridge Mode if available
IP Conflicts and Multiple Routers Using 192.168.100.1
If you have more than one router or extender, they may be using the same LAN IP. This causes:
- Redirecting to the wrong admin page
- Not loading at all
- Random or inconsistent access
Solution:
Change the LAN IP of one device to something different, such as:
- 192.168.2.1
- 192.168.10.1
This prevents clashes inside your network.
Accessing a Cable Modem at 192.168.100.1 Behind a Router
In some setups:
- Your router uses 192.168.1.1
- Your cable modem uses 192.168.100.1
- The router firewall blocks the modem page.
To access the modem:
- Connect a computer directly to the modem with Ethernet
- Reboot the modem and try again.
- Disable bridge Mode if previously enabled
- Some modems only allow access from the LAN side when connected directly.
This is normal behavior for many cable ISPs.
Last Resort: Factory Reset and Full Reconfiguration
If nothing works, the router may be corrupted or misconfigured.
Factory reset steps:
- Press and hold the reset button for 10 to 15 seconds
- Wait for the reboot
- Default settings will return.
You will need to:
- Set up Wi Fi again
- Change admin password
- Reapply port forwarding
- Redo all custom settings.
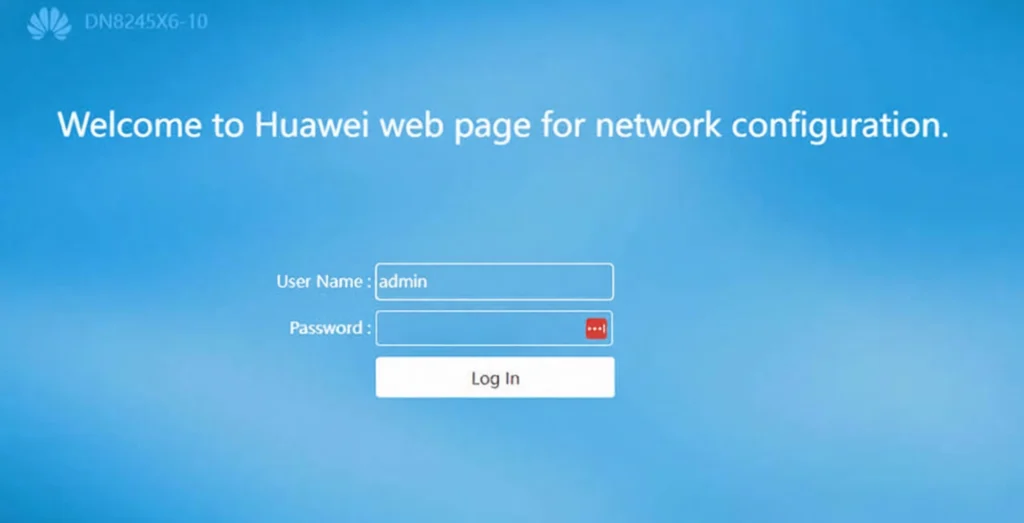
Huawei-Specific Setup Using 192.168.100.1
Huawei routers are widely used across many countries and are often rebranded by ISPs such as PLDT, Converge, Globe, IndiHome, Digi, and others. If your router uses 192.168.100.1 as the default gateway, the following guide covers everything you need for setup, configuration, and security.
Huawei Router Login (Including ISP-Branded Models: PLDT, Converge, IndiHome)
Huawei routers use 192.168.100.1 as the default login IP, regardless of whether the device is a direct Huawei unit or ISP-customized hardware.
How to log in:
- Connect your device to the router (Wi Fi or Ethernet).
- Open a web browser (Chrome, Firefox, Edge, Safari).
- Type http://192.168.100.1 into the address bar and press Enter.
- You will see the login screen.
Common Huawei login credentials:
Username | Password |
admin | admin |
root | admin |
telecomadmin | admintelecom (some ISP versions) |
admin | 1234 |
ISP variations:
- PLDT often uses admin or telecomadmin accounts with tiered privilege levels.
- Converge Huawei routers frequently use admin/admin or admintelecom.
- Globe and IndiHome sometimes turn off advanced menus unless you request higher access.
If the login credentials do not work, check:
- The sticker on the router
- ISP portal or quick-start guide
Your installer’s provided card
Basic Internet and Wi-Fi Setup on Huawei Routers
After logging in, you can configure both Internet and Wi-Fi settings for reliable performance.
Internet (WAN) Setup
Under Internet Settings or WAN, you may see options such as:
- PPPoE – Used by many fiber ISPs; requires username and password
- Dynamic IP (DHCP) – Automatically assigned by ISP
- Static IP – Only if your ISP provided fixed values
- Bridge Mode – For using your own router
Do not change WAN settings unless instructed by your provider.
Wi-Fi Basic and Advanced Settings
Go to Wi-Fi Settings, WLAN Basic Settings, or Home Network depending on your model.
You can configure:
- 2.4 GHz SSID (more extended range)
- 5 GHz SSID (faster speed)
- Separate names for both bands (recommended)
- Wireless Mode and compatibility
- WPA2-PSK or WPA3 encryption
- Wi Fi password
Huawei routers often include advanced wireless menus where you can:
- Change Wi Fi channel
- Set bandwidth (20/40/80 MHz)
- Enable beamforming
Disable WPS for security
Huawei security Features
Huawei routers offer a strong set of security controls. These vary depending on whether the router is ISP-branded.
Firewall Settings
You may find firewall options under security, Firewall, or Advanced:
- SPI Firewall
- Port filtering
- IP filtering
- Anti-DDoS toggle
Most users should keep the firewall enabled for protection.
Parental Controls
Huawei parental control features allow you to:
- Block certain websites
- Restrict internet access for selected devices.
- Set daily or hourly usage schedules.
- Monitor device activity
These settings are usually under Home Network > Parental Control.
Access Control and Device Blocking
In Device Management or Access Control, you can:
- View all devices currently connected
- Block unauthorized devices
- Allow only the allowed MAC addresses.
- Set quality of service rules for priority devices
This improves security and prevents bandwidth abuse.
Saving, Applying, and Backing Up Huawei Configurations
After making any changes:
- Always click Save or Apply
- Some settings (such as Wi Fi changes) may force a reboot.
- Allow the router a few seconds to update before reconnecting.
Huawei routers also provide backup options under System Tools or Maintenance:
- Backup Configuration – Saves your current settings as a file
- Restore Configuration – Load previous settings if something breaks.
- Factory Reset – Returns everything to default
Backing up your settings before significant changes can save you time if anything goes wrong.
Frequently Asked Questions
What is 192.168.100.1, and what is it used for?
It’s a private IP address used to access your router’s admin panel, where you can manage Wi-Fi settings, security options, connected devices, and network configuration.
Is 192.168.100.1 the same as 192.168.l00.1?
No. 192.168.l00.1 is a typo! It uses the letter “l” instead of the number “1”. The correct router login address is 192.168.100.1.
Why can't I access 192.168.100.1 in my browser?
Common reasons include:
- Mistyped IP address
- Your device isn’t connected to the router.
- Your router uses a different default gateway.
- VPN/firewall interference
- The router is unresponsive and needs a restart.
What are the most common default usernames & passwords for 192.168.100.1?
Typical defaults include:
- admin/admin
- admin/password
- root/admin
- (blank) / admin
- Printed on the router sticker
How do I change my Wi-Fi name and password using 192.168.100.1?
Log in to http://192.168.100.1 → go to Wireless/Wi-Fi Settings → edit the SSID and Wi-Fi password → save changes → reconnect devices.